Introduction
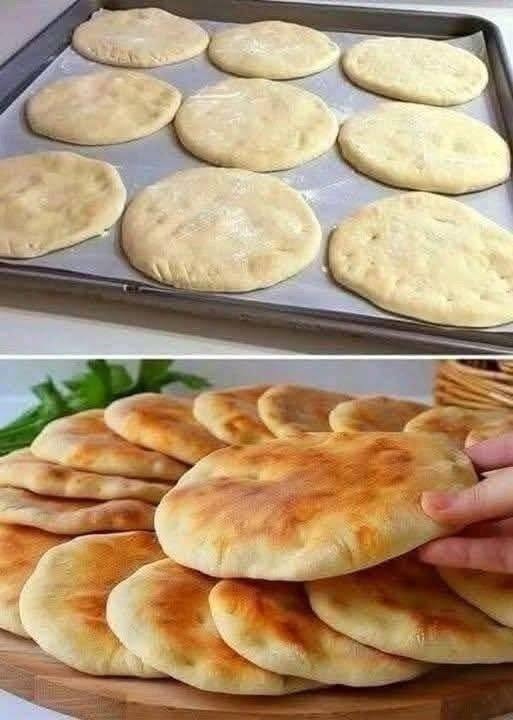
Imagine warm, pillowy soft bread, fresh from the skillet, ready to cradle your favorite fillings or scoop up a delicious dip. That’s exactly what you’ll get with this recipe for Soft Homemade Skillet Flatbread, pita-style! Forget dry, store-bought versions; this homemade flatbread is a revelation, boasting an incredible tenderness and a subtle chew that makes every bite a joy. It’s incredibly versatile, acting as the perfect canvas for everything from savory gyros and falafel to sweet spreads, or simply enjoyed on its own with a drizzle of olive oil and a sprinkle of za’atar.
What makes this particular recipe so special is its accessibility and the sheer delight of creating something so delicious with such minimal effort. No fancy oven required here – just a trusty skillet and a few basic ingredients transform into magic right on your stovetop. The unique cooking method on a hot skillet not only makes it quick but also imparts a delightful char and encourages those beautiful pockets to form, characteristic of a perfect pita. You’ll be amazed at how easily these flatbreads puff up, creating that inviting air pocket that’s ideal for stuffing. The satisfaction of pulling a perfectly golden, puffed flatbread from the pan is truly unmatched, and your kitchen will be filled with an aroma that instantly evokes comfort and culinary adventure.
This recipe is designed to demystify bread making, proving that homemade doesn’t have to be intimidating or time-consuming. It’s a rewarding experience that yields incredibly fresh, flavorful bread far superior to anything you’d find pre-packaged. Whether you’re a seasoned baker or a complete novice, these skillet flatbreads are an absolute game-changer. Get ready to impress yourself and everyone at your table with these wonderfully soft, chewy, and utterly irresistible homemade pita-style flatbreads – they’re so easy, you’ll wonder why you ever bought them from the store!
Nutritional Information
Per serving (approximate values):
Calories: 210
Protein: 7g
Carbohydrates: 40g
Fat: 2g
Fiber: 2g
Sodium: 350mg
Ingredients
3 cups (360g) all-purpose flour, plus more for dusting
1 teaspoon active dry yeast
1 teaspoon granulated sugar
1 teaspoon salt
1 cup (240ml) warm water (105-115°F / 40-46°C)
2 tablespoons olive oil, plus more for brushing
Instructions
In a large mixing bowl, combine the warm water, granulated sugar, and active dry yeast. Stir gently and let it sit for 5-10 minutes, or until the yeast is foamy and activated. This indicates your yeast is alive and ready to work. If it doesn’t foam, your water might be too hot or too cold, or your yeast might be expired.
Add the salt and 2 tablespoons of olive oil to the yeast mixture. Stir until well combined.
Gradually add the all-purpose flour to the wet ingredients, starting with 2 cups and adding the remaining cup as needed. Mix with a wooden spoon or your hands until a shaggy dough forms.
Turn the dough out onto a lightly floured surface. Knead the dough for 7-10 minutes until it becomes smooth, elastic, and no longer sticky. If the dough is too sticky, add a very small amount of flour, a tablespoon at a time. If it’s too dry, add a teaspoon of warm water. The goal is a soft, pliable dough.
Lightly grease the mixing bowl with a little olive oil. Place the kneaded dough in the bowl, turning it once to coat all sides with oil. Cover the bowl with a clean kitchen towel or plastic wrap.
Let the dough rise in a warm place for 1 to 1.5 hours, or until it has doubled in size. The rising time can vary depending on the temperature of your kitchen.
Once the dough has risen, gently punch it down to release the air. Transfer the dough back to a lightly floured surface.
Divide the dough into 8 equal pieces. For best results, you can use a kitchen scale to ensure uniformity, aiming for approximately 80-85g per piece.
Roll each piece of dough into a smooth ball. Cover the dough balls with a clean kitchen towel and let them rest for 10-15 minutes. This resting period allows the gluten to relax, making the dough easier to roll out.
Heat a heavy-bottomed skillet (cast iron or non-stick works best) over medium-high heat. Do not add any oil to the skillet at this stage. You want a dry, hot surface.
While the skillet is heating, take one dough ball and flatten it slightly with your hand. On a lightly floured surface, use a rolling pin to roll the dough into a thin, round disc, about 6-7 inches in diameter and about 1/8 inch thick. Try to keep the thickness as even as possible for uniform puffing.
Once the skillet is hot (a drop of water should sizzle and evaporate immediately), carefully place one rolled flatbread into the dry skillet.
Cook for about 1-2 minutes per side. You’ll know it’s time to flip when you see bubbles forming on the surface of the dough, and the bottom side has developed golden-brown spots.
Flip the flatbread. As the second side cooks, you should start to see the flatbread puff up like a balloon. This is the magic! If it doesn’t puff completely, don’t worry; it will still be delicious.
Cook the second side for another 1-2 minutes, or until it’s also golden brown and slightly charred in spots.
Remove the cooked flatbread from the skillet and immediately place it in a clean kitchen towel or a bowl lined with a towel. Cover it to keep it warm and soft. The steam trapped inside will help maintain its softness.
Repeat the process with the remaining dough balls, rolling and cooking one at a time. Adjust the heat as needed to prevent burning.
Serve the warm, soft homemade skillet flatbreads immediately with your favorite dips, fillings, or as a side to any meal. Enjoy the incredible taste and texture of fresh, homemade bread!
Cooking Tips and Variations
Achieving that perfect, soft, and slightly chewy flatbread is all about technique and a few key considerations. First and foremost, the heat of your skillet is crucial. Ensure your skillet is properly preheated over medium-high heat before adding the dough. A hot skillet creates the instant burst of steam needed for the flatbread to puff up, forming those desirable pockets. If your skillet isn’t hot enough, the bread will cook slowly and might not puff as well. Conversely, if it’s too hot, the exterior will burn before the interior is cooked through. A good test is to flick a few drops of water onto the pan; if they sizzle and evaporate quickly, it’s ready.
When rolling out the dough, aim for an even thickness. Uneven dough can lead to uneven cooking and puffing. Try to roll them to about 1/8 inch thick and around 6-7 inches in diameter. Don’t over-flour your surface when rolling, as too much dry flour can make the dough tough. Just a light dusting is enough to prevent sticking. After rolling, immediately transfer to the hot skillet. Don’t let the rolled dough sit for too long, as it can dry out.
For added flavor, consider brushing the hot flatbreads with a mixture of olive oil, minced garlic, and fresh chopped parsley or cilantro immediately after they come off the skillet. This infuses them with aromatic goodness. You can also experiment with different flours; while all-purpose works wonderfully, substituting a quarter of the all-purpose flour with whole wheat flour can add a nuttier flavor and a slightly denser texture. For a richer flavor, you could also replace a tablespoon of water with plain full-fat yogurt in the dough mixture, which also contributes to a tender crumb.
Spice variations are endless! Knead in a teaspoon of onion powder, garlic powder, or even a pinch of cumin or smoked paprika into the dough for a savory twist. For a truly Middle Eastern flavor, mix in a teaspoon of za’atar seasoning. If you want a cheesy flatbread, sprinkle a tablespoon of shredded mozzarella or feta cheese onto the dough before folding it in half and rolling it out (this will create a cheesy filling rather than a traditional pita pocket, but it’s delicious!). For a slightly sweeter option, a tiny pinch of cinnamon in the dough can be surprisingly delightful, especially if serving with fruit or sweet spreads.
For Complete Cooking STEPS Please Head On Over To Next Page Or Open button (>)
For Complete Cooking STEPS Please Head On Over To Next Page Or Open button (>)